How to Make a Chrome Extension in 2025 (Manifest V3 + Validation Guide)
The complete guide to building a Chrome extension that people actually want. Learn how to validate your idea, set up Manifest V3, build a working MVP, and publish to the Chrome Web Store.

Most Chrome extension tutorials will teach you how to write code.
This one will teach you how to build something people actually use.
Here's the uncomfortable truth: Thousands of Chrome extensions have 0 users. Not because the code was bad. Because the developer skipped the first step and built a solution looking for a problem.
In the next 7 minutes, you'll go from zero to a published Chrome extension. But more importantly, you'll know before you start coding whether anyone actually wants it.
Let's begin.
Step 0: Validate Your Idea (Before You Write a Single Line of Code)
This is the step every tutorial skips. And it's why most extensions fail.
Before you open VS Code, you need to answer one question: Is anyone already frustrated by this problem?
The fastest way to find out is to look at your competitors' reviews.
The Manual Way (The Hard Way)
- Find 3-5 extensions that do something similar to your idea.
- Go to their Chrome Web Store pages.
- Click "Reviews" and filter by "Recent" or "1-Star."
- Read through 200-500 reviews.
- Copy every complaint into a spreadsheet.
You'll start to see patterns:
- "This extension crashes when I have 50+ tabs."
- "Why did they put dark mode behind a paywall?"
- "The new UI is so confusing."
These aren't complaints. These are validated feature requests.
The Fast Way (Using Extension Radar)
Reading 500 reviews takes hours. And humans are bad at spotting trends.
I built Extension Radar to do this in 30 seconds.
- Paste a competitor's Chrome Web Store URL.
- Click Analyze.
- Get an instant breakdown of what users love and hate.
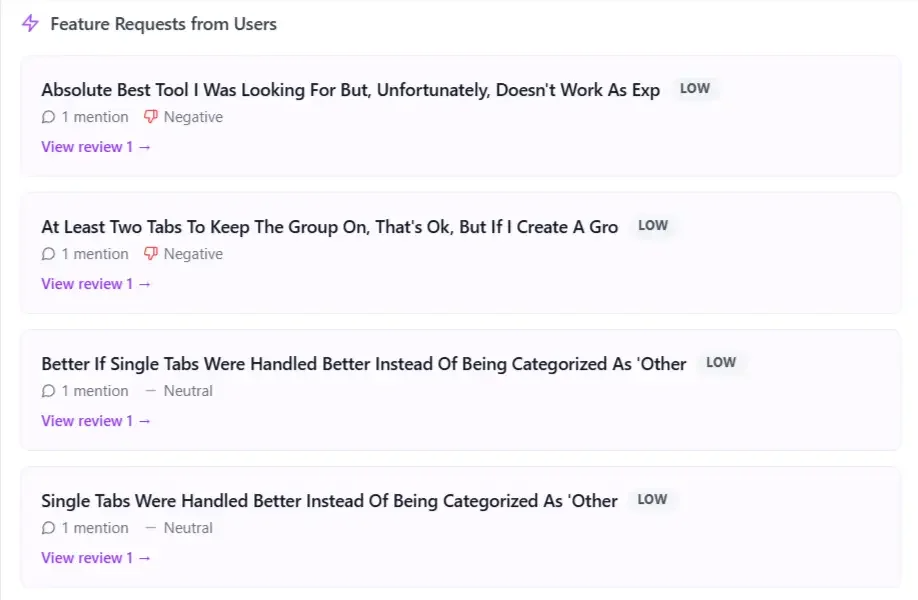
The AI analyzes thousands of reviews and tells you:
- Top Complaints: "45% of users mention crashing."
- Feature Gaps: "20% are asking for cloud sync."
- Churn Signals: "10% are switching to Competitor X."
If your idea solves the #1 complaint, you have a validated idea. If not, you just saved yourself 3 weeks of wasted coding.
👉 Get Lifetime Access to Extension Radar for $29
Step 1: Set Up Your Project (Manifest V3)
Important: As of 2024, Google requires all new extensions to use Manifest V3. Many old tutorials still use V2, which won't work. This guide uses V3.
Create a new folder for your project. Inside, create these files:
my-extension/
├── manifest.json
├── popup.html
├── popup.js
└── icon.png
The Manifest File
This is the "brain" of your extension. It tells Chrome what your extension does and what permissions it needs.
Create manifest.json:
{
  "manifest_version": 3,
  "name": "My First Extension",
  "version": "1.0.0",
  "description": "A simple Chrome extension built with Manifest V3.",
  "action": {
    "default_popup": "popup.html",
    "default_icon": "icon.png"
  },
  "permissions": [],
  "icons": {
    "16": "icon.png",
    "48": "icon.png",
    "128": "icon.png"
  }
}
Key differences from Manifest V2:
manifest_versionis now3.browser_actionis replaced withaction.- Background scripts are now service workers (we'll cover this later).
Step 2: Build the Popup UI
The popup is what users see when they click your extension icon.
Create popup.html:
<!DOCTYPE html>
<html>
<head>
  <style>
    body {
      width: 300px;
      padding: 16px;
      font-family: -apple-system, BlinkMacSystemFont, 'Segoe UI', Roboto, sans-serif;
    }
    h1 {
      font-size: 18px;
      color: #1a1a1a;
    }
    button {
      width: 100%;
      padding: 12px;
      background: #0284c7;
      color: white;
      border: none;
      border-radius: 8px;
      font-size: 14px;
      cursor: pointer;
    }
    button:hover {
      background: #0369a1;
    }
  </style>
</head>
<body>
  <h1>🚀 My First Extension</h1>
  <p>Click the button to change the page background.</p>
  <button id="changeColor">Change Background</button>
  <script src="popup.js"></script>
</body>
</html>
Step 3: Add Functionality
Now let's make the button actually do something.
Create popup.js:
document.getElementById('changeColor').addEventListener('click', async () => {
  // Get the current active tab
  const [tab] = await chrome.tabs.query({ active: true, currentWindow: true });

  // Execute a script on that tab
  chrome.scripting.executeScript({
    target: { tabId: tab.id },
    func: () => {
      document.body.style.backgroundColor = '#' + Math.floor(Math.random()*16777215).toString(16);
    }
  });
});
Wait! This script needs a permission. Update your manifest.json:
{
  "manifest_version": 3,
  "name": "My First Extension",
  "version": "1.0.0",
  "description": "A simple Chrome extension built with Manifest V3.",
  "action": {
    "default_popup": "popup.html",
    "default_icon": "icon.png"
  },
  "permissions": ["activeTab", "scripting"],
  "icons": {
    "16": "icon.png",
    "48": "icon.png",
    "128": "icon.png"
  }
}
We added activeTab and scripting permissions. We'll talk about why this matters in the next section.
Step 4: Load and Test Your Extension
- Open Chrome and go to
chrome://extensions/. - Enable Developer mode (toggle in the top right).
- Click Load unpacked.
- Select your project folder.
Your extension should now appear in the toolbar. Click it, then click the button. The page background should change to a random color!
Step 5: How to NOT Get Rejected (Common Mistakes)
The Chrome Web Store review team rejects extensions for predictable reasons. Avoid these:
❌ Requesting Unnecessary Permissions
The #1 rejection reason. If you request <all_urls> but only need access to youtube.com, you'll be rejected.
Rule: Only request the minimum permissions you need.
❌ Vague or Misleading Descriptions
Your store listing must clearly explain what your extension does. "Makes your life easier" is not acceptable.
Rule: Be specific. "Changes the background color of any webpage with one click."
❌ Missing Privacy Policy
If you collect any data (even error logs), you need a privacy policy URL.
Rule: Create a simple privacy policy page and link it in your Developer Dashboard.
✅ Explain Why You Need Each Permission
In your store listing, add a section like:
Permissions Explanation:
activeTab: To access the current page when you click the extension.scripting: To change the page's background color.
This builds trust with users AND the review team.
Step 6: Publish to the Chrome Web Store
You're ready to go live.
1. Pay the One-Time Developer Fee
Go to the Chrome Web Store Developer Dashboard.
You'll need to pay a $5 one-time fee to register as a developer.
2. Prepare Your Assets
You'll need:
- Icon: 128x128 PNG.
- Screenshots: At least 1 screenshot (1280x800 or 640x400).
- Description: Clear, keyword-rich description.
- Category: Choose the most relevant category.
3. Zip Your Extension
Select all files in your project folder and create a .zip file. Do NOT zip the folder itself—zip the contents.
4. Upload and Submit
- Click New Item in the Developer Dashboard.
- Upload your
.zipfile. - Fill in the listing details.
- Submit for review.
5. Wait for Review
Google's review process typically takes 1-3 business days. If you followed the guidelines above, you should be approved on the first try.
Frequently Asked Questions
How hard is it to make a Chrome extension?
Not hard at all! If you know basic HTML, CSS, and JavaScript, you can build a simple extension in under an hour. The tricky part is building one that people actually want—which is why validation (Step 0) is so important.
How much does it cost to make a Chrome extension?
The only required cost is the $5 one-time developer fee to publish on the Chrome Web Store. Development is free. If you use Extension Radar for validation, that's an additional $29 for lifetime access.
What language are Chrome extensions written in?
Chrome extensions are built with HTML, CSS, and JavaScript. No special languages required. Manifest V3 uses standard web technologies.
How long does it take to get approved on the Chrome Web Store?
Typically 1-3 business days. Simple extensions often get approved within 24 hours. Complex extensions or those requesting sensitive permissions may take longer.
Can I make money with a Chrome extension?
Yes! Common monetization models include:
- Freemium: Free tier with paid premium features.
- Subscription: Monthly/yearly plans.
- One-time purchase: Lifetime access.
- Affiliate links: Recommend related products.
Conclusion
You now have everything you need to build, validate, and publish a Chrome extension in 2025.
But remember: The code is the easy part. The real skill is finding a problem worth solving.
Don't build in the dark. Use competitor reviews to find validated opportunities.
Ready to validate your first idea?
Ready to analyze your Chrome extension?
Get AI-powered insights from your reviews in 60 seconds. No scraping required.
Analyze Your Extension Free